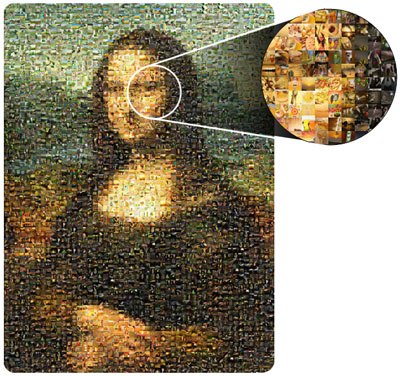
linkPhotomosaic
The photomosaic is a technique that uses a large image made from many small, colorful pieces. With one difference the "mosaic stones", the photos, each have their own image as well. This way there are two dimensions to the image. The main image, which gives the mosaic its overall effect, and the many individual images. A photo is formed by photos.
linkProblem Statement
Recreate a picture based on a set of overlapping images.
linkBackground
Fascination with mosaics is not a new thing. Mosaic is an art that has been around for a long time. A picture is being generated using small, colourful stones or glass pieces. That is how famous artworks in palaces and villas were created. Today's view of mosaics is still very much effected by those ancient artworks.

Over the centuries this art technique was preserved and was responsible for the visual design of important architectural structures. In the time of the Renaissance and Classicism they became more important. In those times the mosaic technique and handwork were in trend. Because of that mosaics can still be seen in the remnants of those times, in ruins and buildings from those eras.
Mosaics are also related to the controversial painting style Pointillism. Pointillism reached its peak at the end of the 19th Century. Today it is present in the works of Paul Signac, Henri Edmond Delacroix or Georges Seurat.
linkMethodology
A mosaic is created by joining together a number of overlapping images and converting them into a single, seamless picture. The correspinding pictures is selected based on the brightness or color similarity with the group of pixels evaluated.
linkCode
This program is written in javascrip and uses a very powerfull drawing library called p5.js. It uses a flower dataset available at artensoft. In addition, Python was used to manipulate the dataset by resizing and getting the predominant color of each image.
linkDataset Manipulation
The original picture is divided in small blocks. Each block is replaced by an specific image available in the dataset. To make a precise match, the images in the dataset must have a representative color. ColorThief is a python library that handles this process.The images names are changed by its main color in RGB presentation. On the other hand, due to the dataset size, each image is reduce to a size of 64x64.
linkLoading the dataset
To make a scalable solution, the available colors are saved in a .txt file. In the preload function, the loadStrings function triggers a callback. In this case, the callback function is loadDataset(). The purpose of this function is to load the dataset images and obtain their color representation in RGB.
1linkfrom colorthief import ColorThief
2linkfrom PIL import Image
3linkfrom glob import glob
4linkfrom os import rename
5link
6linkfiles = glob("dataset/*.jpg")
7linkfor f in files:
8link # resize
9link image = Image.open(f)
10link new_image = image.resize((64,64))
11link new_image.save(f)
12link # color
13link color_thief = ColorThief(f)
14link rgb = color_thief.get_color(quality=1)
15link rename(f,"dataset/{}_{}_{}.jpg".format(rgb[0],rgb[1],rgb[2]))
linkDeciding the best image
The closestColor function is in charge of selecting and painting the image in the dataset that matches the most with the pixel that is evaluated. The desicion is based on the Euclidian distance between the RGB parameter and all the dataset RGBs.
linkFirst steps
The first step is to initialize the global variables that are being used along the code. Then, the picture and the dataset are loaded in the preload function. Finally the canvas is created.
linkChanging a pixel by and image
Taking into account that an image will replace a group o pixels; the easiest way to handle the groups of pixels is by reducing the original picture. This process makes that a unique pixel has a color representation of the group. The implementation uses an ScaleFactor to decide size of the groups. Once we have the reduced image, we iterate over all the pixels and we use the closestColor function to find the proper image.
linkResults
1linklet picture;
2linklet w_scaled;
3linklet h_scaled;
4linklet availableColors;
5linklet dataset= [];
6linklet loadedImages = [];
7linkconst scaleFactor = 8;
8linkconst datasetSize =105;
9link
10linkfunction preload() {
11link   const location = '../sketches/workshop1/w4/regular_show.jpg'
12link   picture = loadImage(location);
13link   loadStrings('../sketches/workshop1/w4/availableColors.txt',loadDataset)
14link   //loadDataset();
15link   noLoop()
16link}
17link
18linkfunction setup() {
19link   createCanvas(600, 600);
20link   noLoop();
21link}
22linkfunction draw() {
23link   w_scaled = Math.floor(picture.width / scaleFactor);
24link   h_scaled = Math.floor(picture.height / scaleFactor);
25link   picture.resize(w_scaled,h_scaled);
26link   picture.loadPixels();
27link   for(let x = 0; x < w_scaled; x++) {
28link       for(let y = 0; y < h_scaled; y++) {
29link           const [r, g, b] = picture.get(x, y);
30link           const index = closestColor(r,g,b);
31link           const pixelImage = loadedImages[index];
32link           image(pixelImage,x*scaleFactor,y*scaleFactor);
33link       }
34link   }
35link}